SWEATER PATTERN | knitting gallery| spinning gallery | fiber bloghome | to do list: fibers | faq | other blog
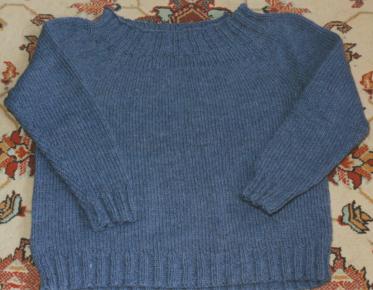
Instructions for blue
wool/alpaca sweater.
(click here to download in PDF format)
I borrowed heavily from Knitting Without Tears by Elizabeth Zimmerman. Therefore, I do not copyright this pattern, and recommend all her books to anyone out there who hasn't discovered her fine work yet.
First of all, I used Cascade Yarns 50% Superfine Alpaca/50% Wool. I'd highly recommend this blend as the alpaca lends a beautiful softness and drape.
I used size 6 circular needles (24" long) to achieve a gauge of 4.25 stiches per inch. You needn't match my gauge, but when you do a swatch, it is important to do it in the round (my gauge is different on 2 needles than it is on circulars, and I'd bet dollars to donuts yours is too.) and it is vitally important to measure your gauge precisely, over at least 4 inches, down to a fraction of a stitch. I failed to do this the first time through, thinking a couple inches was good enough and rounding up to a whole stitch, and the sweater ended up grotesquely huge and I had to rip out once I was about 7 inches into it. (I could have knit it up for my fat mother, but I'm basically an ungrateful child, so I ripped out and started over.)
So here's what to do. Pick a yarn and some needles and knit a circular swatch. If you don't like the way the fabric looks, pick another needle and find a fabric look you do like. Figure out your exact gauge. Next, decide how large you want your sweater to measure at the bust. I like to pick a sweater I already have that fits well and measure that, rather than measure my own bust. So, in my sweater, I wanted it to measure 42" around the bust, I multiplied that by my gauge of 4.25 and came up with 178.5. I had to round that down to 176 so it was evenly divisible by 4 (my ribbing uses 4 stiches: k2, p2). Cast on 176 stitches, or whatever number you came up with when you multiplied your gauge by your desired number of inches. Work k2,p2 ribbing for about 2.25 inches. On the next round, begin stockinette stitch but remember to increase back to your other figure (178 in my case) so your measurements come out as precisely as possible. Feel free to use a slightly smaller needle on the ribbing, so it will hold in tighter, then switch back to your other needle for the body. At this point, you will want to place markers at the exact side seams of your sweater. I put safety pins in the 1st stitch and the 90th stitch. Which should be 88 stiches between the stitch markers for front and back, or damn close.
Elizabeth Zimmerman taught me about short rows. There is a particularly good explanation of this process in her book Knitting Workshop. If you add a couple of short rows on the back of a sweater knit in the round, it will make the back slightly longer than the front and will prevent the sweater from riding up in back and bunching up in front. Short rows are accomplished by knitting all the way around the sweater until you come to within three stitches of the stitch marker, then wrap and turn as follows: yarn forward, slip the next stich as if to purl, yarn back, slip the stitch back on to the left hand needle, turn the work around and purl across to within 3 stiches of other stitch marker, yarn back, slip next stitch as if to purl, yarn forward, slip stitch back onto left needle, turn, and knit back across the back and continue in stockinette stitch as normal, when you come to the wrapped stitches, work the stich and the wrap together. This will make it nearly invisible. You will want to add about 3 sets of shorts rows through the body of the sweater, at somewhat regular intervals. I find it helpful to place a safety pin where I've inserted a short row, so I can tell at a glance where I put the last on, and which is the back of the sweater and which is the front. Short rows are worth the trouble, believe me.
Continue knitting until you reach the desired length to the under arm. Again, measuring an existing sweater is helpful here. If you don't have a sweater or a shirt you like the length of, then a good idea is to stop the sweater about two inches short of your armpit. My sweater measures 14 inches to the underarm, measuring from the front, not the back, which is intentionally longer due to the short rows.
Side seams: Take the side seam stitch you marked with a safety pins off the needle and drop it all the way down to the first row of knitting to form a huge scary run. Seriously. I quote from Elizbeth Zimmerman for the next step: "take a crochet hook, put it through the stitch of the first round, and hook the next two stitches through it together. Then one stich, then two together again, then one stictch, then two and so on, up to the top of the piece." This forms a ridge along the side that gives the appearance of an actual seam and helps the sweater hang properly. You can omit it, but it's a nice touch.
Next, sleeves. For some freakish reason, I knit my sleeves on two needles, I think I forgot that my size 6-12 inch circulars were stuck in another project and in a panic I just decided to knit back and forth and sew them up. I do not recommend this. It is silly. So, allow me to simply quote what I should have done from <i>Knitting Without Tears:
"A long sleeve is started with one-fifth (20%) of the body stitches; in the case of a 200-stitch sweater, 40 stitches. Cast them on a 16" [circular] needle, working very loosely, so that they reach around. (You may use four sock needles at the beginning of a sleeve if you wish.) Join, as for the body, and work around. After four rounds, make you first increase:
"Mark 3 stiches for the vertical underarm line, and increase one stich before the three stitches and one after them. Work four more rounds and repeat these increases, using whatever method you prefer...The main thing is that the three stitches of your underarm line remain undisturbed. They will soon start to be visible between the increases, and will serve as a guide to keep the increase line straight.
"Continue to increase every fifth round until you have 1/3 of your body stiches or 33%. In case of a 200-stitch sweater it will be between 66 and 67 stitches. From this point work straight to the underarm."
Obviously, you do this twice, and in the case of this design, you'll want to work 2.25 inches of k2, p2 ribbing before >you begin the increases. I recommend using the sock needles to start, so you're ribbing doesn't get all stretched out. Then comes the exciting part. You will join all the stitches of the sleeves and body together on your long circular needle. Except for a couple of underarm stitches you'll weave together later. So take your sleeves and figure out 8% of the body stitches (in my case it was 178 X .08 =14.24 or 14 stiches). Count out these 14 stiches using the underarm stiches and a more or less equal number on either side of and put them on a stitch holder or a piece of contrasting wool, I recommend a stich holder, as it's easier to work with later. Do this for each sleeve. Next, place the same number of stiches from the body at the corresponding underarms on stich holders. This is where your side seam markers come in handy again. Put your side seam stitch on the marker and then count out a more or less even number of stitches to total the number you calculated (14) on either side of the side seam. EZ says the underarms of the sleeves and body piece should be "diametrically opposed."
Now, knit across the front of the body until you come to the underarm stitches you have placed on the holder, then knit the sleeve stitches onto the needle, knit across the back, then knit the other sleeve stiches onto the needle. You'll want to knit the first and last stiches where you join the arms fairly tightly, as the weight of the sweater will pull on them as you continue to knit and loosen them up. Knit straight for four inches if you are short (I'm 5'1" on a good day) or perhaps 5 if you are taller, or especially long torsoed. Now work the decreases for the yoke. <b>Simply K1, K2 together all the way around. Knit straight for another inch (or 1-1/2 if you're taller) then work the K1, K2 together decrease again. Count your stitches and make sure they are divisible by four, if not, sneak in an increase or a decrease to get to a number that is divisible by four, and then work good old k2, P2 ribbing again for 2.25-2.5 inches. Bind off loosely and gently in pattern. Weave the underarms toghether with Kitchener stitch and sew together the little triangles that will remain as best you can. Weave in all joins and there you have it!
Enjoy!
And please feel free to email me with any questions.